Hostwinds Tutorials
Search results for:
Table of Contents
Troubleshooting SSH Connection Issues
Tags: VPS
When you cannot connect to your server through SSH, there are a variety of causes that may have happened. This guide will walk you through troubleshooting some common things to check when unable to connect to your server through SSH.
Is The Server On?
While this does seem like a self-evident thing to check, sometimes this is the cause of being unable to SSH into your server. As when the server is off, it will not respond to SSH as it normally would.
If The Server Is A VPS Hosted Here
If this is a VPS plan that is Hosted with Hostwinds, you can check the status of the VPS from the Cloud Control portal. If the VPS is in the Running state, it should be Online.

If the VPS is not online, you can click on the Server Name, and on the next page, click on the Green Boot button, which will start the VPS back up.

If This Is A Dedicated Server Hosted Here
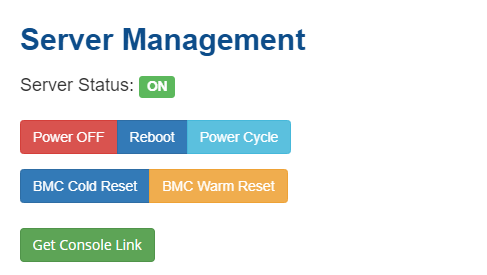
If the server is a Dedicated Server hosted with Hostwinds, you can check the server status from the Client Area by clicking the Green Manage button. Then lower on the page, there will be the Server Status listed,

When the Server Status shows OFF, the Power OFF button will become a Power ON button that you can use to start the server back up.
Is The Server Connected To The Internet?
After confirming the server is On, the next most likely cause for being unable to SSH is that the server is unavailable over the internet. An incorrect configuration can cause this on the server or even a local network issue. If the server is hosted with Hostwinds, you will access the server through VNC, either from the Client Area or Cloud Portal.
Accessing VNC Through The Cloud Portal
From the Cloud Portal you will see a list of your VPS Services that you have with Hostwinds. Next to the Server, there will be an Actions link. Clicking this will reveal an option to Get VNC. A pop-up new window will appear, so it is important to ensure you have popups to connect with the VNC to the server.

Accessing VNC For a Dedicated Server
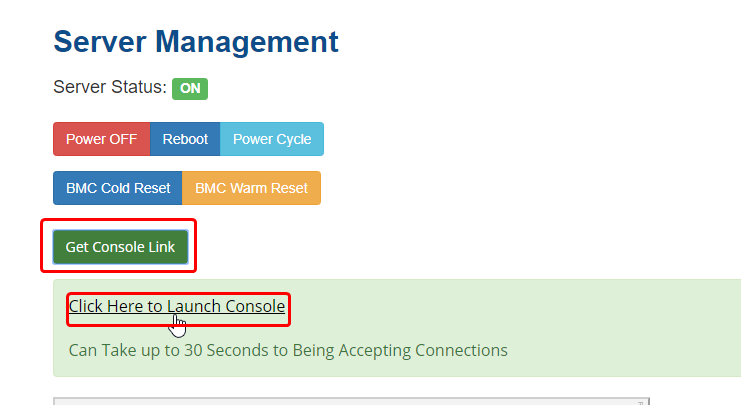
In the Client Area, if you click on the Green Manage button next to the Dedicated Server, you will be brought to a Server Management page. Under the Server Management controls, clicking Get Console Link will create a link for you to access the server. This may take a few moments before it resolves appropriately when the link is opened.

Testing Internet Connection
Once you are connected to the server (either physically or through VNC) and logged in, you can test the server's internet connection. The simplest way to do this is with a ping command to a well-known site, such as google.com. The command you can use for this would be as follows,
ping google.com
After using entering that command and hitting enter, it should spit out some output. If it gets stuck (as in, no output being displayed) or gives any error, this means there may be an issue with the internet connection or hostname resolution. If the connection was successful, it might look similar to this,

To stop the ping command from running on endlessly, press Left Control + C at the same time to stop the process.
If There Is No Internet
If the ping test does not work and there is no internet on the server, it may need to be manually set up. While connected to the server through VNC or physically, use the following command to see the status of the network interface,
ifconfig
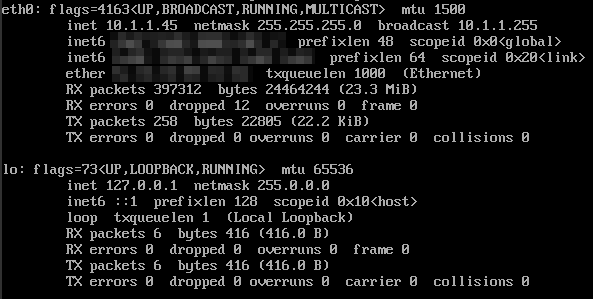
With the results from this command, it may look a little intimidating though there is specific information to look for. The first is that your Network Interface is listed. Most commonly, this would be eth0. However, it can vary on the operating system and how it was configured. Here are some example results,

We are mainly concerned with the inet values. (The inet6 is for IPv6). The first value will be the IP address of the Interface. If this is a Dedicated Server or VPS plan and the inet does not match the Dedicated IP for the server, this may be the cause of the problem. Where this would be changed can vary depending on the operating system, though common locations include,
- CentOS 6 / 7 - /etc/sysconfig/network-scripts/ifcfg-eth0
- Debian 8 / 9 - /etc/network/interfaces
Debian 8 / 9
Debian 8 and 9 would use the network configuration listed in the file /etc/network/interfaces. Edit this file with your preferred Text Editor (such as nano or vim) so that it has the following,
auto eth0
    iface eth0 inet static
        address <IPADDRESS>
        netmask 255.255.255.0
        gateway <GATEWAY>
Replace \ with the IP address of your server and \ with the Gateway of the server. In most cases, this will be your IP address, just changing the last number to be 1. For example, if your IP is 192.168.0.45, the Gateway would be 192.168.0.1.
After the change is made and saved, restart the Networking for the server (alternatively restarting the server should also restart the networking). This can be done using the command,
/etc/init.d/networking restart
CentOS 6 / 7
With CentOS 6 and 7, the network configuration file will be inside the directory /etc/sysconfig/network-scripts . The name of the file, however, can depend on the Interface name. If eth0 is the interface, the filename would be ifcfg-eth0. Edit this file with your preferred Text Editor and change lines or add the following,
BOOTPROTO=static
IPADDR=<IPADDRESS>
NETMASK=255.255.255.0
GATEWAY=<GATEWAY>
Same with the Debian steps, replace \ with the IP address of your server and \ with the Gateway of the server.
After the change has been saved to the network configuration, restart the networking on the server using the following command,
service network restart
Does The Server Have SSH Listening?
If the internet is confirmed to be working on the server, SSH is not enabled or running on the server. The process to check this may vary, though the following command should work to check the status,
service sshd status
With the output of this command, it will tell you if the SSH server is up and Active or failed for any reason. If SSH is down on the server, the following command can be used to start it back up,
service sshd start
If the service fails to start, there may be another issue. Checking the server status should reveal more information about why it had failed to start. If the server is still not responding through SSH, you can try changing the SSH port to see if this helps to resolve the issue. After the SSH Port is changed, you will need to restart the service using,
service sshd restart
If you should have any questions or would like assistance, please contact us through Live Chat or by submitting a ticket with our Technical Support team.
Written by Hostwinds Team / June 5, 2021
