Hostwinds Tutorials
Search results for:
Table of Contents
How to Setup a Subdomain Using cPanel
What is a Subdomain?
A subdomain is a subdivision or extension of a larger domain name within the Domain Name System (DNS) hierarchy. It is created by adding a prefix to the main domain and is used to organize and categorize different sections or services of a website. By allocating a subdomain, website owners can assign a unique address to specific content or functionality, allowing for easier navigation and management of their online presence. For example, in the subdomain "blog.hostwinds.com," "blog" is the subdomain, "hostwinds" is the main domain, and ".com" represents the top-level domain (TLD). Subdomains can be used for various purposes, such as hosting a blog, creating separate sections for different departments or countries, or setting up specific services like mail servers or online stores.
How do I Create a Subdomain in cPanel?
The following are steps to create subdomains within your cPanel account. Note, to proceed with these steps, you will need shared hosting, business hosting, or a VPS with a cPanel/WHM license at Hostwinds.
Logging into cPanel
To add a subdomain, the first step is to log in to your cPanel account. You can access cPanel directly from your Hostwinds account, steps are reviewable here: https://www.hostwinds.com/product-docs/web-hosting/log-in-to-cpanel. If you prefer alternative methods to log in to cPanel, you can refer to https://www.hostwinds.com/tutorials/how-to-access-cpanel for further instructions.
Shared and Business Hosting
To set up a subdomain within our shared hosting and business hosting options with an advanced package or ultimate package, follow these steps:
- Once logged in, navigate to the "Domains" section on the cPanel home page and click on it.

2. Within the "Domains" section, locate and click the "Create a New Domain" button. This option allows you to manage additional domains and subdomains associated with your cPanel account.
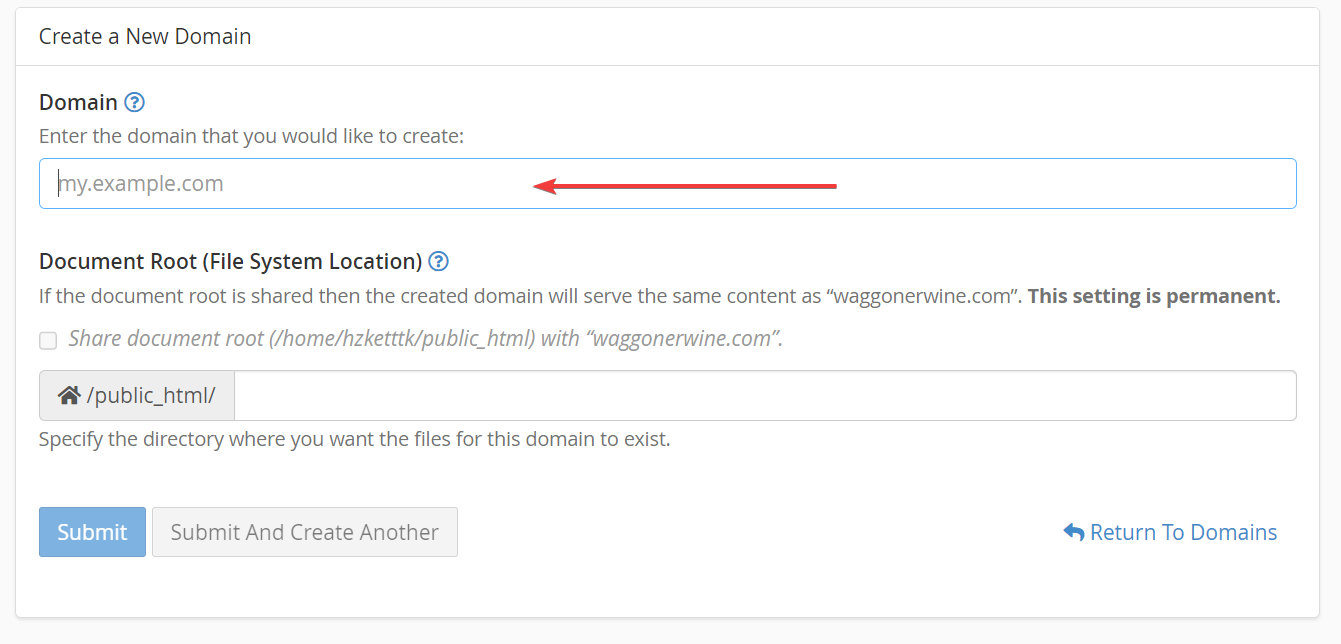
3. In the form that appears, enter the desired subdomain prefix in the "Domain" field. For example, if you want to create the subdomain "blog.example.com," enter "blog" in this field.

4. The "Document Root" field will automatically suggest a directory path based on the subdomain name and the selected domain. You can modify this if necessary or leave it unchanged.
5. After entering the subdomain and selecting the desired document root, click the "Submit" button to create the subdomain.
6. cPanel will proceed to create the subdomain, and you should receive a success message confirming its creation.
Alternative Hosting Packages and cPanel Licenses
Please be aware that the steps provided below are general guidelines for adding a subdomain within cPanel. While these steps may not be entirely accurate for versions such as our shared and business hosting options, the fundamental principles remain applicable.
- Once you're logged in, look for the "Domains" or "Domains" section. The exact wording might vary depending on your cPanel theme or version.
- In the "Domains" section, you should find an option called "Subdomains" or "Subdomains Manager." Click on it to proceed.
- In the subdomain management interface, you'll typically see a form where you can enter the desired subdomain name. Enter the subdomain prefix you want to use (e.g., "blog" for "blog.example.com").
- Choose the main domain under which you want to create the subdomain. This can be selected from a drop-down menu if you have multiple domains associated with your cPanel account.
- If needed, you may also have the option to select a document root directory for the subdomain. The document root is the folder where the files for the subdomain will be stored. If you leave this field empty, cPanel will create a directory based on the subdomain name within the main domain's document root.
- After filling in the required details, click on the "Create" or "Add" button to create the subdomain.
Written by Dustin Waggoner / December 13, 2016
