Hostwinds Tutorials
Search results for:
Table of Contents
Microsoft Management Console (Windows Server)
What is the Microsoft Management Console (MMC)?
The Microsoft Management Console (MMC) is a flexible interface that allows you to access various server and PC management tools, like the Device Manager and Performance Monitor.
These tools, known as Snap-ins, can be added to MMC allowing for quick access from a single interface.
How to Open Microsoft Management Console
There are a few ways to launch MMC from your computer. The most common are:
- Windows Run Command
- Command Prompt
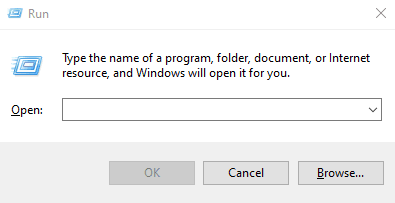
To open the MMC Using Run command
Step 1: Open Run Command
Press Windows Key + R to open the Run dialog box.
Step 2: Run MMC
- Type "mmc" and press Enter, opening a prompt.
Step 3: Allow App to Make Changes
- Click "Yes" in the prompt, opening the MMC window
To Open MMC Using Command Prompt
Step 1: Run as Administrator
In the Windows search bar type "cmd"
Within the Command Prompt results, click on "Run as administrator"
A popup window will appear. Click "Yes"
Step 2: Open MMC
In the Command Prompt window, type "mmc" and hit Enter to launch the Microsoft Management Console.
Adding Snap-ins to MMC
Once you've launched Microsoft Management Console, you can start adding snap-ins.
To add a Snap-in in MMC
Step1: Open Add/Remove Snap-in.. window
Click File > Add/Remove Snap-in... or as a shortcut press [Ctrl] + M.
Step 2: Add Snap-ins
A list of available snap-ins will be on the left. Select the desired tools then click Add.
Once finished adding the tools click OK.
The Snap-ins you selected will now appear in the middle pane of the MMC. You can double-click any Snap-in to open and use it within the console.
Removing Snap-ins from MMC
You can also remove snap-ins from your Microsoft Management Console in the same window where you added them.
To Remove a Snap-in in MMC
Step1: Open Add/Remove Snap-in.. window
- Click File > Add/Remove Snap-in... or as a shortcut press [Ctrl] + M.
Step 2: Remove Snap-ins
- The list of snap-ins currently in your console will be on the right. Select the desired tools then click Remove
- Once finished, click OK.
Saving Your MMC Configuration
Once you've set up the tools you need, you can save your configuration for future use:
Step 1: Click File > Save or press [Ctrl] + S.
Step 2: Choose a name for your console file (e.g. 'DeviceMonitor.msc'.) and click Save
To Load Your Saved MMC Configuration
Step 1: Open the MMC.
Step 2: Click File > Open or press [Ctrl] + O.
Step 3: Select your saved '.msc' file.
Managing MMC Access
Microsoft Management Console allows the administrator to manage who can access and modify settings and Snap-ins within the MMC by assigning different permission levels.
The console can be run in different modes, including:
Author Mode: Full access to all features.
User Mode (Full Access): Users can access all Snap-ins but cannot add new ones.
User Mode (Limited Access): Limits the Snap-ins users can access and the scope of their functions.
Configure Console Mode
Step 1: Click File > Options.
Step 2: In the Console Mode section, choose the mode appropriate for your needs.
Set Permissions for MMC Console Files
Step 1: Right-click the saved .msc file and select Properties.
Step 2: Go to the Security tab and set the permissions for different users or groups, allowing or restricting access to open, modify, or execute the console file.
Written by Hostwinds Team / November 1, 2019


