Hostwinds Tutorials
Search results for:
Table of Contents
Install Odoo (Ubuntu 18.04)
If you would like to use the Odoo Management Software to help manage your company, then this guide will show you what you need to do to manually install Odoo on a Hostwinds Linux Server with Ubuntu 18.04
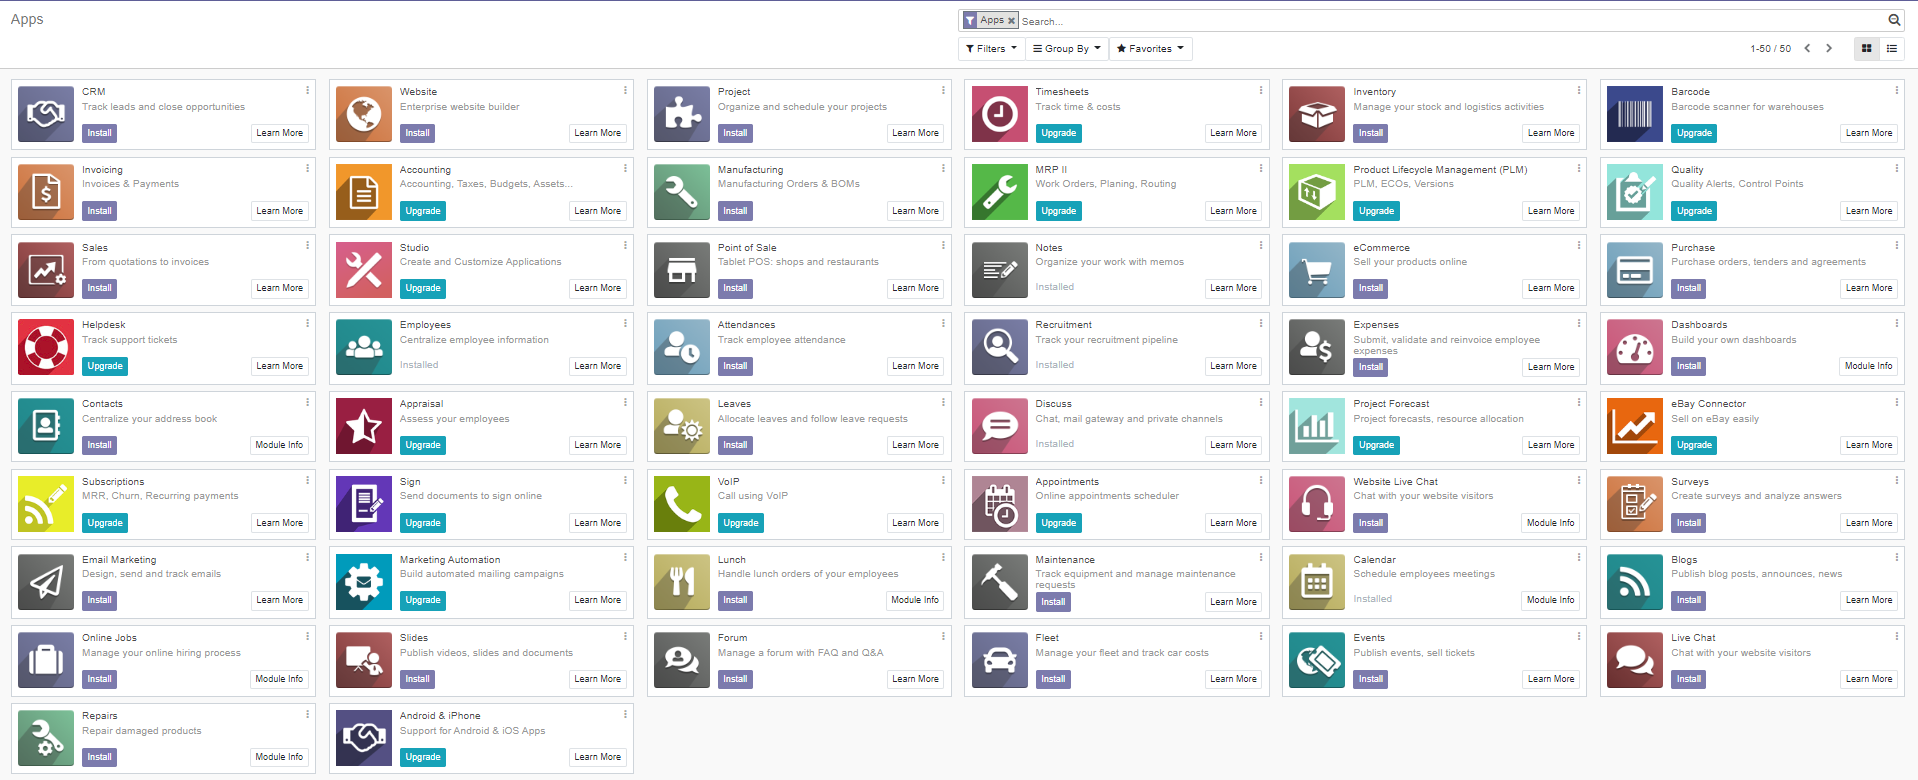
The Odoo Management Software offers several features to install and allows you to customize the setup. This allows you to create the management platform that you want. Below is an image that shows all of the features you can install and integrate with your management platform.

Available installations for Odoo
To start with the installation, you would want to start with a fresh OS installation. For this guide, we will be using Ubuntu 18.04 to install Odoo. You can do so from the Cloud Control Portal. Just click on the Actions Drop Down Menu, then Select the Reinstall Option.

Select Reinstall under the Actions Menu
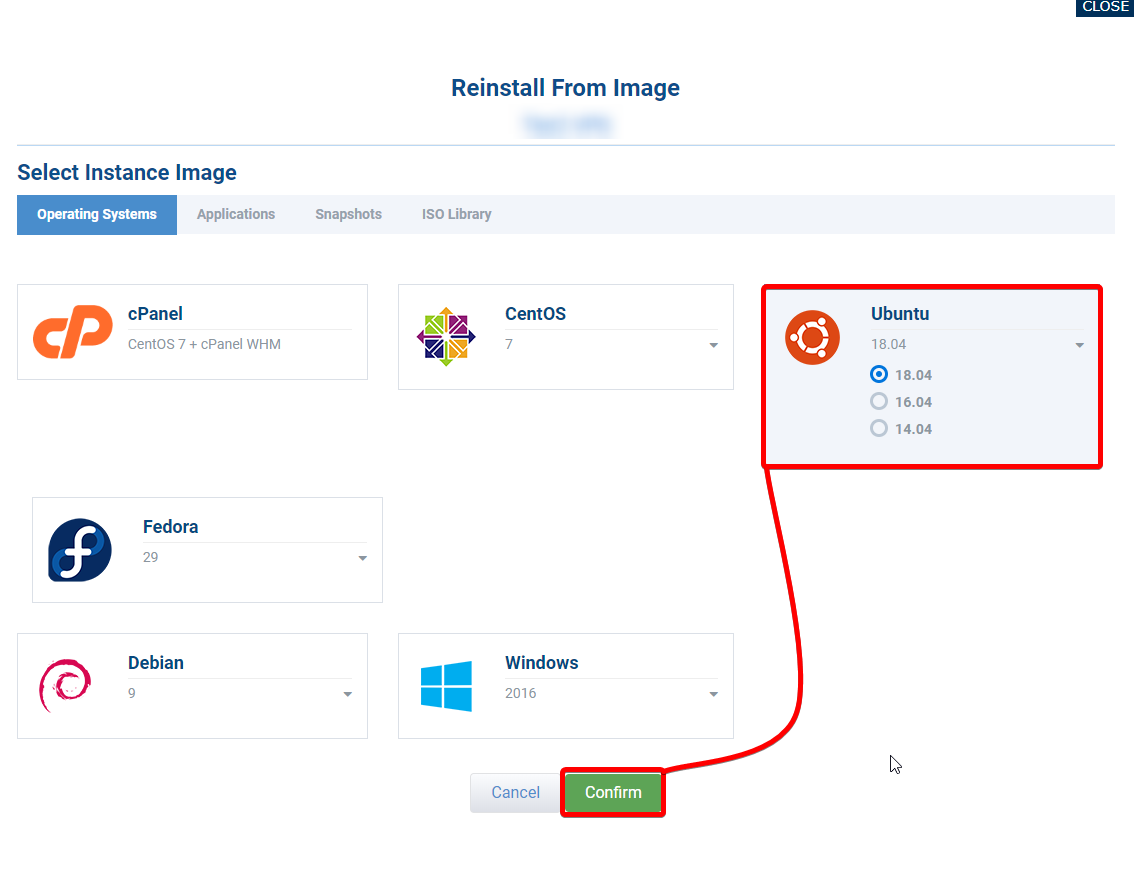
Then select Ubuntu 18.04 and then Confirm.

Select Ubuntu 18.04, then confirm.
Once you have installed Ubuntu 18.04, you need to log in to the VPS via SSH. You would do so using your IP address, username 'root,' and Password. All of this should be available in the Cloud Control Portal for the server you have installed Ubuntu 18.04 on. At the end of this article, I will have all of the commands without any additional text so that you can quickly run through the steps to install Odoo as well.
Installing Odoo on Ubuntu 18.04
To start the installation, you would want to make a new user and give them sudo permissions. This user will be the user who will ultimately be running your Odoo application on your server.
Getting Started
Create New User, make sure your password is secure as they will have sudo access:
adduser [username]
Give New User Sudo Privileges :
usermod -aG sudo [username]
Login to the New User:
su [username]
Update and Upgrade the Server:
sudo apt-get update
sudo apt-get upgrade -y
Once the server is updated with the default packages, you would want to install the following packages specifically. Install Python Packages and other Libraries. Many things are being downloaded, and it would take quite a bit of time to explain them all. To learn more about how they work together, you can check to see what each of them does through documentation online.
sudo apt install git python3-pip build-essential wget python3-dev python3-venv python3-wheel libxslt-dev libzip-dev libldap2-dev libsasl2-dev python3-setuptools npm node-less libpq-dev -y
Next, we will want to install the Python Dependencies through the pip3 installer. Note the default timeout that is set to 1000. In some cases, the Babel package will take a significant amount of time to connect. Having this argument will prevent it from timing out and not install correctly.
Install Python Dependencies:
pip3 --default-timeout=1000 install Babel decorator docutils ebaysdk feedparser gdata gevent greenlet html2text Jinja2 lxml Mako MarkupSafe mock num2words ofxparse passlib Pillow psutil psycogreen psycopg2 pydot pyparsing PyPDF2 pyserial python-dateutil python-openid pytz pyusb PyYAML qrcode reportlab requests six suds-jurko vatnumber vobject Werkzeug XlsxWriter xlwt xlrd
Create Web Dependencies for Odoo
Next, we will be setting the Web Dependencies for Odoo with the following 2 lines. We will be installing the Leaner Style Sheets (LeSS) through NPM to help to convert Less.js code to CSS code and the less plugin-clean-CSS to help clean up the code it generates. Libsass is a compiler for the CSS code that will be generated.
sudo npm install -g less less-plugin-clean-css

sudo python3 -m pip install libsass
Install PostgreSQL
Now we will be installing the PostgreSQL onto the server and set it to update automatically. Odoo will be utilizing the PostgreSQL database for its users, data, and installations. First, we will edit the pgdg—list for the apt function to check for PostgreSQL.
sudo nano /etc/apt/sources.list.d/pgdg.list
In this file, we will add the line:
deb http://apt.postgresql.org/pub/repos/apt/ xenial-pgdg main
Then we will download and install the PostgreSQL from the following wget command.
wget --quiet -O - https://www.postgresql.org/media/keys/ACCC4CF8.asc | sudo apt-key add -
After that has finished, make sure to run an update, then install PostgreSQL.
sudo apt-get update
sudo apt-get install postgresql-9.6 -y
Create Database Users for Odoo
We will want to start by logging in to the Postgres user to create the other database users. Then be sure to move to the Postgres users folder by simply typing cd.
sudo su postgres
cd
Once here, we would want to create two users, the odoo user and another user that you can name what you wish, but we would recommend making it the same as the user you have created with the Sudo privileges.
createuser -s odoo
createuser -s [ubuntu_user_name]
Now that we are finished with the PostgreSQL user, we will want to exit from that user.
exit
Create Odoo User and Group
Next, we will want to create the odoo user, who will be running the Odoo service on the server later in this guide. We will also set its home directory to where we are planning to install the Odoo software for ease of access.
sudo adduser --system --home=/opt/odoo --group odoo
Download Odoo
Now we will install Odoo from the repository in Github by running the following command. First, we will navigate to the opt folder for the odoo user.
cd /opt/odoo
Then we are going to log in to our Odoo user we made the step before.
sudo su - odoo -s /bin/bash
From GitHub, we will be downloading the Odoo installation into the /opt/odoo folder.
git clone https://www.github.com/odoo/odoo --depth 1 --branch 12.0 --single-branch
Now we should be finished with the Odoo user.
exit
Make Odoo Log File
Next, we will create the Log file for the Odoo installation so that it can record any changes or updates made. You would wish to create the file then give permissions to your Odoo user from earlier with the following commands.
sudo mkdir /var/log/odoo
sudo chown -R odoo:root /var/log/odoo
Odoo Configuration File
We need to create the configuration file for the Odoo installation and again set the ownership to our Odoo user.
sudo nano /etc/odoo.conf
In this File, add the following lines as they are, other than the addons_path. The path should be one of the 2 following paths noted, or if you installed it elsewhere, then to the path you had set up.
[options]

; This is the password that allows database operations:

; admin_passwd = admin

db_host = False

db_port = False

db_user = odoo

db_password = False

logfile = /var/log/odoo/odoo-server.log
#Set the correct path to the addons directory
addons_path = /opt/odoo/addons,/opt/odoo/odoo/addons
Then set the ownership for the Odoo user.
sudo chown odoo: /etc/odoo.conf
Install WKHTMLTOPDF for Odoo
Finally, we will be installing wkhtmltopdf, which is used to convert HTML to PDF for the Odoo installation. You would want to make sure that you do not install this as root as it may cause an issue, as if it is installed with as root, it will give a warning error.
sudo wget https://builds.wkhtmltopdf.org/0.12.1.3/wkhtmltox_0.12.1.3-1~bionic_amd64.deb
Next, install the wkhtmltopdf with the following command.
sudo apt install ./wkhtmltox_0.12.1.3-1~bionic_amd64.deb -y
Then copy the installations to the /usr/bin folder as well.
sudo cp /usr/local/bin/wkhtmltoimage /usr/bin/wkhtmltoimage
sudo cp /usr/local/bin/wkhtmltopdf /usr/bin/wkhtmltopdf
We now have Odoo installed on the server and can start running it and set up your Odoo for your business.
cd /opt/odoo/odoo
./odoo-bin
Verify Odoo Installation
Now that we have the service running, we can quickly check to see if the installation is running. You can check this by going to port 8069 on your server's IP address in a browser window.
https://AAA.BBB.CCC.DDD:8069
Make a Service
Next, now that we have confirmed to make the installation successfully, we can make a service. A service will allow Odoo to run without having to have a server window open all the time. The service will allow you to specify who will run the program and run it in the background. To make a service, follow the below code as it is entered.
su root
###############################################################
sudo echo "[Unit]
Description=Odoo Server
After=network.target
StartLimitIntervalSec=0
[Service]
Type=simple
Restart=always
RestartSec=1
User=odoo
ExecStart=/opt/odoo/odoo/odoo-bin
[Install]
WantedBy=multi-user.target" >> /etc/systemd/system/odoo.service
###############################################################
systemctl daemon-reload
systemctl start odoo
systemctl enable odoo
Code Commands
If you are looking for a list of the commands that you would need to run, you can use the below list that has been slightly modified. The lines in between the 2 walls of '#' are all part of the same command.
adduser [username]
usermod -aG sudo [username]
su [username]
sudo apt-get update
sudo apt-get -y upgrade
sudo apt install git npm python3-pip build-essential wget python3-dev python3-venv python3-wheel libxslt-dev libzip-dev libldap2-dev libsasl2-dev python3-setuptools node-less libpq-dev -y
pip3 --default-timeout=1000 install Babel decorator docutils ebaysdk feedparser gdata gevent greenlet html2text Jinja2 lxml Mako MarkupSafe mock num2words ofxparse passlib Pillow psutil psycogreen psycopg2 pydot pyparsing PyPDF2 pyserial python-dateutil python-openid pytz pyusb PyYAML qrcode reportlab requests six suds-jurko vatnumber vobject Werkzeug XlsxWriter xlwt xlrd
sudo npm install -g less less-plugin-clean-css
sudo python3 -m pip install libsass
sudo echo "deb http://apt.postgresql.org/pub/repos/apt/ xenial-pgdg main" >> /etc/apt/sources.list.d/pgdg.list
wget --quiet -O - https://www.postgresql.org/media/keys/ACCC4CF8.asc | sudo apt-key add -
sudo apt-get update
sudo apt-get install postgresql-9.6 -y
sudo su postgres
cd
createuser -s odoo
createuser -s ubuntu_user_name
exit
sudo adduser --system --home=/opt/odoo --group odoo
cd /opt/odoo
sudo su - odoo -s /bin/bash
git clone https://www.github.com/odoo/odoo --depth 1 --branch 12.0 --single-branch
exit
sudo mkdir /var/log/odoo
sudo chown -R odoo:root /var/log/odoo
###############################################################
sudo echo "[options]
; This is the password that allows database operations:
; admin_passwd = admin
db_host = False
db_port = False
db_user = odoo
db_password = False
logfile = /var/log/odoo/odoo-server.log
addons_path = /opt/odoo/addons,/opt/odoo/odoo/addons" >> /etc/odoo.conf
###############################################################
sudo chown odoo: /etc/odoo.conf
sudo wget https://builds.wkhtmltopdf.org/0.12.1.3/wkhtmltox_0.12.1.3-1~bionic_amd64.deb
sudo apt install ./wkhtmltox_0.12.1.3-1~bionic_amd64.deb -y
sudo cp /usr/local/bin/wkhtmltoimage /usr/bin/wkhtmltoimage
sudo cp /usr/local/bin/wkhtmltopdf /usr/bin/wkhtmltopdf
su root
###############################################################
sudo echo "[Unit]
Description=Odoo Server
After=network.target
StartLimitIntervalSec=0
[Service]
Type=simple
Restart=always
RestartSec=1
User=odoo
ExecStart=/opt/odoo/odoo/odoo-bin
[Install]
WantedBy=multi-user.target" >> /etc/systemd/system/odoo.service
###############################################################
systemctl daemon-reload
systemctl start odoo
systemctl enable odoo
Written by Gregory Gilbert / October 29, 2019
