Hostwinds Tutorials
Search results for:
Table of Contents
How To Use Email Marketing With WHMCS
One of the many features that WHMCS provides is the Email Marketer. This feature allows you to set custom rules to email current and previous clients registered through you. You can set it to send out specific marketing emails to your clients based on different options, such as the number of products they have or the days they have been active. This is a fantastic feature that WHMCS provides out of the box that we will cover in this guide.
Where To Find The Email Marketer In WHMCS
Step One: Log into your WHMCS Admin Dashboard
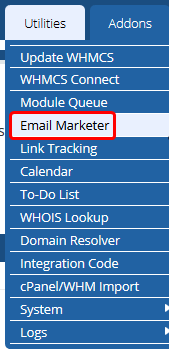
Step Two: From the top menu, navigates to Utilities -> Email Marketer, to be brought to the page where you can manage the Marketing Rules for automatic emails sent.

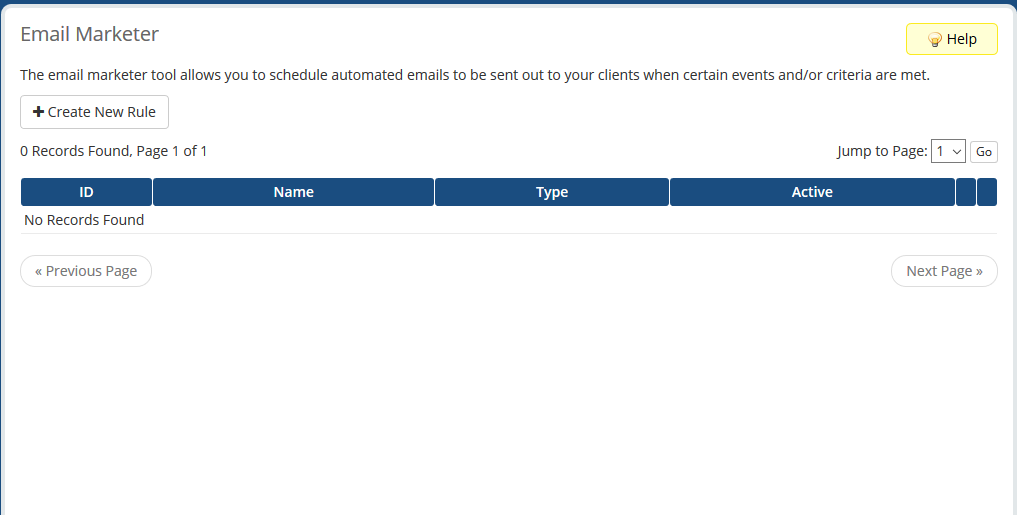
From this page, you will be able to make and manage Marketing Rules for the sent emails.

Creating A New Rule In The Email Marketer
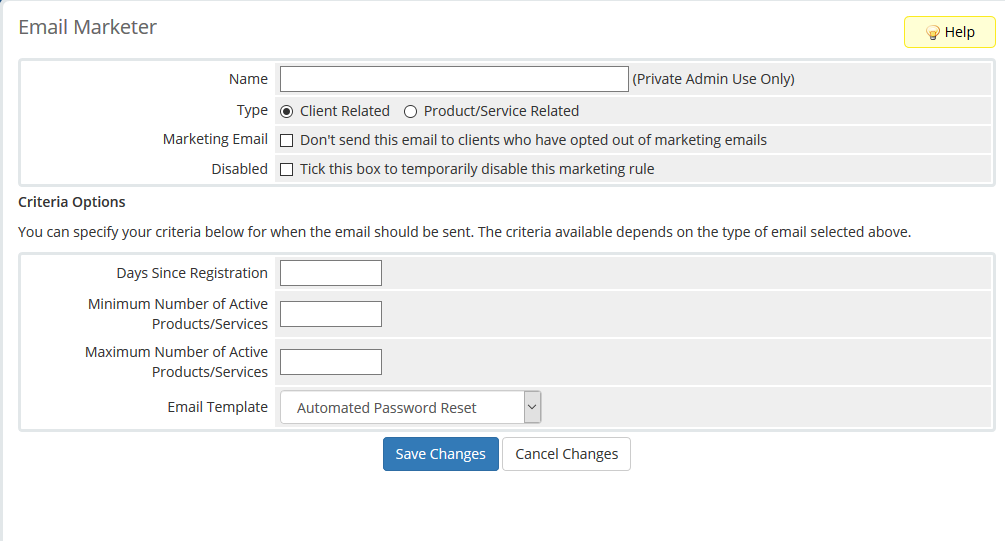
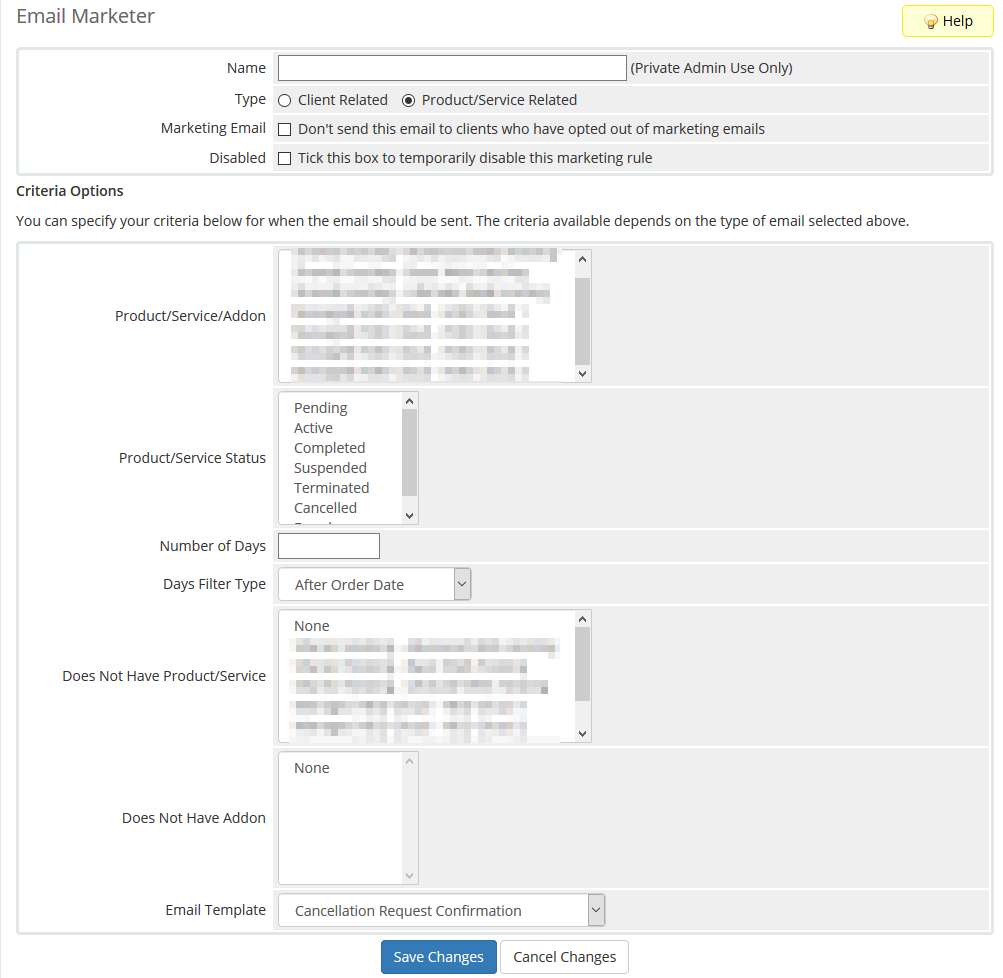
When creating a rule that the WHMCS Email Marketer will use, there is the option to select between two different types. There is the Client Related rule and the Product/Service Related to type of rule. These determine the additional Criteria Options that will be available. The top of the new Rule forms will remain the same, the only difference being the type that is selected.

- Name – Name that can be seen internally for the Marketing Rule. Used to identify a quick description of the rule and its purpose.
- Type – The type of Rule that will be created. With options being Client Related and Product/Service Related.
- Marketing Email – This is if you want clients to exempt themselves from this type of email rule being made if they have opted out of marketing emails.
- Disabled – You can temporarily disable the rule by making this box active.
Client Related Email Marketing Rule

- Days Since Registration – The minimum days since the client has been registered for the email to be sent.
- Minimum Number of Active Products/Services – You can specify the minimum amount of services on the client's account before the email is sent. If left blank, this option will be ignored.
- Maximum Number of Active Products/Services – If you want to limit the email to be sent only if the client has under a certain amount of products active, this option can help to influence that. If left blank, this option will be ignored.
- Email Template – This is the email template that will be sent to the client.
Product/Service-Related Email Marketing Rule

- Product/Service/Addon – Here, you can select the product, service, or addon used to determine whether the email will be sent. This list will be the same as your Products List within WHMCS.
- Product/Service Status – This is where the status required of the product can be selected. Here you can further specify the products for the emails to be sent out for.
- Number of Days – This value relies on the next Days Filter Type value, as it will be used mainly for that purpose.
- Days Filter Type – Here, you can set how long after a certain event that the email is sent to the client. This field is dependent on the value input for the Number of Days field. Examples of Filter Types include, After Order Date, which would be the days after the client had initially ordered the product before the Next Due Date, where the client would be emailed the specified amount of days before their next due date for the product. After the Next Due Date, the amount of days input will send an email after the due date has been passed.
- Does Not Have Product/Service – If you want to exclude clients that already have a certain product or service, you can select that here so that they will be excluded from the Automated Email.
- Does Not Have Addon – Similar to excluding based on Product. However, this allows you to exclude based on the Addon that the client has. For example, if marketing an addon, you will most likely not want to try and sell an Addon to a client that already has it active on their account.
- Email Template – This is the email template that will be sent to the client.
Once you have finished setting up the new Email Marketing rule, it can be saved with the Save Changes button, putting the rule into effect. After the rule is added, it will now be visible and accessible from the Main Email Marketer page.

How To Modify An Existing Marketing Rule
From time to time, you may want to modify an existing Marketing rule to change a certain criteria or option about it. Luckily this can be done from the WHMCS Email Marketer page. From the list of current records, you can select the Icon to the right of the record. It will look almost like a pen and paper. It will look like the following:

How To Remove An Existing Marketing Rule
If you are done with the marketing promotion or want to remove a marketing rule for any reason, this can be done from the Main WHMCS Email Marketer page. The red minus icon to the right of the record will allow you to remove the Marketing Rule permanently.

If you should have any questions or would like assistance, please contact us through Live Chat or by submitting a ticket with our Technical Support team.
Written by Hostwinds Team / September 5, 2018
