Hostwinds Tutorials
Search results for:
Table of Contents
Generating a CSR Request (and What it is)
Tags: SSL
Now that you've purchased an SSL through Hostwinds, you'll receive an email with the link to configure your SSL. The link will send you to a form, and after a few steps, requests that you generate a CSR. This will be the next major step you need to take towards setting up SSL for your site.
You can purchase an SSL or Wildcard SSL from the Hostwinds cart anytime from here.
How Do I Create My SSL?
Step 1: Click on the link in your SSL purchase email (this email is sent to the registered email associated with your Hostwinds account.
Step 2: Choose your Web Server Type from the drop-down menu
The most common types are cPanel and Microsoft IIS 5.x
Step 3: Start your CSR Request
What Is A CSR?
A Certificate Signing Request (CSR) is an encoded chunk of text generated during your SSL application. To complete your SSL, you must copy the Encoded CSR provided during the application process and send it to the Certificate Authority. The CSR is used by certificate authorities (CA's) to generate your SSL.
Generating A CSR Request
Enter your Certificate Signing Request (CSR) from the drop-down menu
Step 1: Login into cPanel
Step 2: Home > Security > SSL/TLS

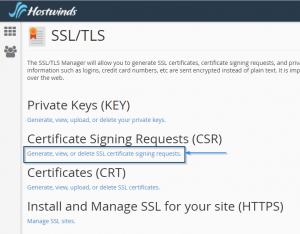
Step 3: Generate a Certificate Signing Request

Step 4: Pick generate a new, 2,048 bit key from the dropdown
Step 5: Enter your domain
Always include your domain name with or without www. to make sure it is correct
Step 6: Fill in City, State, and Country text boxes
This must match your WHOIS information
**Step 7: ** Enter Company name text box
This also must match your WHOIS information
Step 8: Enter Company Division textbox
This will need to match the "Job Title" on Configure SSL Certificate form on your Hostwinds form.
Step 9: Enter email in the text box
This will be used to verify you as the domain owner and should be a valid email address.
Step 10: Enter a Passphrase
Step 11: Enter a Description
Step 12: Click the Generate button
This will generate your CSR for you and provide a massive link you'll need to copy and paste back in the previous form.
Complete The SSL Creation Process
Step 1: Copy the Encoded CSR text
Step 2: Place CSR text into the text box on the Configure SSL certificate page in the server information
Step 3: Fill in the same information you used to generate the CSR in the Administrative Contact Information section
Step 4: Push the Click to Continue
Step 5: Review information
Step 6: Pick the email that the certificate approval will be sent to
Step 7: Push the Click to Continue email
Once you finish this process, you'll need to wait until you receive the approver email. The approver email will provide you with a link that you need to click on and say whether you APPROVE or DO NOT APPROVE the certificate. APPROVE the certificate by hitting the proper button, and your SSL will be sent to your email.
In some cases, you may need to provide the SSL after further review of your account manually.
Next Step
Once you've received the approver email that includes your actual SSL from a certificate authority (CA's), move on to the next guide, Steps to install and set up an SSL from scratch.
Written by Hostwinds Team / December 13, 2016
