Hostwinds Tutorials
Search results for:
Table of Contents
How to Block Access to Your Website in cPanel
Tags: cPanel
When you have a website, you want to bring in as much traffic as possible, but sometimes, you find a few bad actors out there that don't necessarily have the best of intentions. In times like these, you have the option to protect your site by blocking individuals who you deem malicious. You not only have the ability to block a single IP, but you can also do several or even whole countries. The steps in this article will walk you through adding these blocks to your .htaccess file.
Editing .htaccess file
1. Log into cPanel. Once you are in, select File Manager

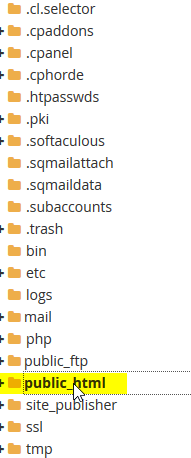
2. Navigate to your document root, which is the Public_HTML directory.

3. To be able to view the .htaccess
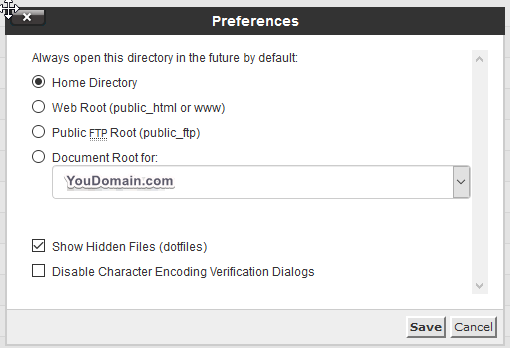
- navigate to the upper right-hand corner click on Settings

- In your preferences, select the document root for the domain you wish to edit and click on Show Hidden Files in your preferencesSelect.

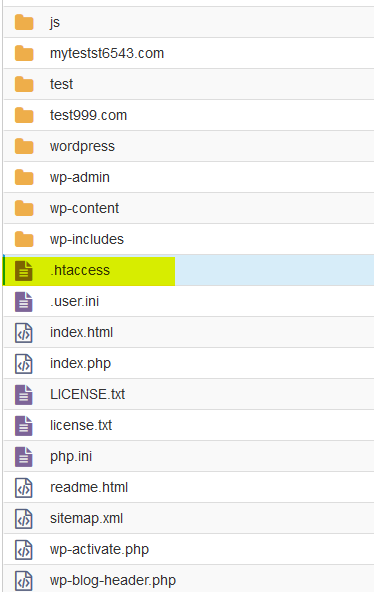
4. In your domain's document root, select the .htaccess file and click Edit in the upper toolbar.

5. Once you're in the editor, you can add a block like below to ban a single host where you replace the XXX for octets of the IP address.
order allow,
deny deny from XXX.XXX.XXX.XXX/32
deny from XXX.XXX.XXX.XXX/32
allow from all
6. To ban based on country codes, add a block like below. In this example, we used the United States (US), Canada (CA), and Mexico (MX).
\
GeoIPEnable On
Below is where you add the countries you wish to ban
SetEnvIf GEOIP_COUNTRY_CODE US DenyCountry
SetEnvIf GEOIP_COUNTRY_CODE CA DenyCountry
SetEnvIf GEOIP_COUNTRY_CODE MX DenyCountry
Allow from all
Deny from env=DenyCountry
Below is a comprehensive list of country codes.
- AD,"Andorra"
- AE,"United Arab Emirates"
- AF,"Afghanistan"
- AG,"Antigua and Barbuda"
- AI,"Anguilla"
- AL,"Albania"
- AM,"Armenia"
- AO,"Angola"
- AP,"Asia/Pacific Region"
- AQ,"Antarctica"
- AR,"Argentina"
- AS,"American Samoa"
- AT,"Austria"
- AU,"Australia"
- AW,"Aruba"
- AX,"Aland Islands"
- AZ,"Azerbaijan"
- BA,"Bosnia and Herzegovina"
- BB,"Barbados"
- BD,"Bangladesh"
- BE,"Belgium"
- BF,"Burkina Faso"
- BG,"Bulgaria"
- BH,"Bahrain"
- BI,"Burundi"
- BJ,"Benin"
- BL,"Saint Bartelemey"
- BM,"Bermuda"
- BN,"Brunei Darussalam"
- BO,"Bolivia"
- BQ,"Bonaire, Saint Eustatius and Saba"
- BR,"Brazil"
- BS,"Bahamas"
- BT,"Bhutan"
- BV,"Bouvet Island"
- BW,"Botswana"
- BY,"Belarus"
- BZ,"Belize"
- CA,"Canada"
- CC,"Cocos (Keeling) Islands"
- CD,"Congo, The Democratic Republic of the"
- CF,"Central African Republic"
- CG,"Congo" CH,"Switzerland"
- CI,"Cote d'Ivoire"
- CK,"Cook Islands"
- CL,"Chile" CM,"Cameroon"
- CN,"China" CO,"Colombia"
- CR,"Costa Rica" CU,"Cuba"
- CV,"Cape Verde"
- CW,"Curacao"
- CX,"Christmas Island"
- CY,"Cyprus"
- CZ,"Czech Republic"
- DE,"Germany"
- DJ,"Djibouti"
- DK,"Denmark"
- DM,"Dominica"
- DO,"Dominican Republic"
- DZ,"Algeria"
- EC,"Ecuador"
- EE,"Estonia"
- EG,"Egypt"
- EH,"Western Sahara"
- ER,"Eritrea"
- ES,"Spain"
- ET,"Ethiopia"
- EU,"Europe"
- FI,"Finland"
- FJ,"Fiji"
- FK,"Falkland Islands (Malvinas)"
- FM,"Micronesia, Federated States of"
- FO,"Faroe Islands"
- FR,"France"
- GA,"Gabon"
- GB,"United Kingdom"
- GD,"Grenada"
- GE,"Georgia"
- GF,"French Guiana"
- GG,"Guernsey"
- GH,"Ghana"
- GI,"Gibraltar"
- GL,"Greenland"
- GM,"Gambia"
- GN,"Guinea"
- GP,"Guadeloupe"
- GQ,"Equatorial Guinea"
- GR,"Greece"
- GS,"South Georgia and the South Sandwich Islands"
- GT,"Guatemala"
- GU,"Guam"
- GW,"Guinea-Bissau"
- GY,"Guyana"
- HK,"Hong Kong"
- HM,"Heard Island and McDonald Islands"
- HN,"Honduras"
- HR,"Croatia"
- HT,"Haiti"
- HU,"Hungary"
- ID,"Indonesia"
- IE,"Ireland"
- IL,"Israel"
- IM,"Isle of Man"
- IN,"India"
- IO,"British Indian Ocean Territory"
- IQ,"Iraq"
- IR,"Iran, the Islamic Republic of"
- IS,"Iceland"
- IT,"Italy"
- JE,"Jersey"
- JM,"Jamaica"
- JO,"Jordan"
- JP,"Japan"
- KE,"Kenya"
- KG,"Kyrgyzstan"
- KH,"Cambodia"
- KI,"Kiribati"
- KM,"Comoros"
- KN,"Saint Kitts and Nevis"
- KP,"Korea, Democratic People's Republic of"
- KR,"Korea, Republic of"
- KW,"Kuwait"
- KY,"Cayman Islands"
- KZ,"Kazakhstan"
- LA,"Lao People's Democratic Republic"
- LB,"Lebanon"
- LC,"Saint Lucia"
- LI,"Liechtenstein"
- LK,"Sri Lanka"
- LR,"Liberia"
- LS,"Lesotho"
- LT,"Lithuania"
- LU,"Luxembourg"
- LV,"Latvia"
- LY,"Libyan Arab Jamahiriya"
- MA,"Morocco"
- MC,"Monaco"
- MD,"Moldova, Republic of"
- ME,"Montenegro"
- MF,"Saint Martin"
- MG,"Madagascar"
- MH,"Marshall Islands"
- MK,"Macedonia"
- ML,"Mali" MM,"Myanmar"
- MN,"Mongolia"
- MO,"Macao"
- MP,"Northern Mariana Islands"
- MQ,"Martinique"
- MR,"Mauritania"
- MS,"Montserrat"
- MT,"Malta"
- MU,"Mauritius"
- MV,"Maldives"
- MW,"Malawi"
- MX,"Mexico"
- MY,"Malaysia"
- MZ,"Mozambique"
- NA,"Namibia"
- NC,"New Caledonia"
- NE,"Niger"
- NF,"Norfolk Island"
- NG,"Nigeria"
- NI,"Nicaragua"
- NL,"Netherlands"
- NO,"Norway"
- NP,"Nepal"
- NR,"Nauru"
- NU,"Niue"
- NZ,"New Zealand"
- OM,"Oman"
- PA,"Panama"
- PE,"Peru"
- PF,"French Polynesia"
- PG,"Papua New Guinea"
- PH,"Philippines"
- PK,"Pakistan"
- PL,"Poland"
- PM,"Saint Pierre and Miquelon"
- PN,"Pitcairn"
- PR,"Puerto Rico"
- PS,"Palestinian Territories"
- PT,"Portugal" PW,"Palau"
- PY,"Paraguay"
- QA,"Qatar"
- RE,"Reunion"
- RO,"Romania"
- RS,"Serbia"
- RU,"Russian Federation"
- RW,"Rwanda"
- SA,"Saudi Arabia"
- SB,"Solomon Islands"
- SC,"Seychelles"
- SD,"Sudan"
- SE,"Sweden"
- SG,"Singapore"
- SH,"Saint Helena"
- SI,"Slovenia"
- SJ,"Svalbard and Jan Mayen"
- SK,"Slovakia"
- SL,"Sierra Leone"
- SM,"San Marino"
- SN,"Senegal"
- SO,"Somalia"
- SR,"Suriname"
- SS,"South Sudan"
- ST,"Sao Tome and Principe"
- SV,"El Salvador"
- SX,"Sint Maarten"
- SY,"Syrian Arab Republic"
- SZ,"Swaziland"
- TC,"Turks and Caicos Islands"
- TD,"Chad"
- TF,"French Southern Territories"
- TG,"Togo"
- TH,"Thailand"
- TJ,"Tajikistan"
- TK,"Tokelau"
- TL,"Timor-Leste"
- TM,"Turkmenistan"
- TN,"Tunisia"
- TO,"Tonga"
- TR,"Turkey"
- TT,"Trinidad and Tobago"
- TV,"Tuvalu"
- TW,"Taiwan"
- TZ,"Tanzania, the United Republic of"
- UA,"Ukraine"
- UG,"Uganda"
- UM,"United States Minor Outlying Islands"
- US,"United States"
- UY,"Uruguay"
- UZ,"Uzbekistan"
- VA,"Holy See (Vatican City State)"
- VC,"Saint Vincent and the Grenadines"
- VE,"Venezuela"
- VG,"Virgin Islands, British"
- VI,"Virgin Islands, U.S."
- VN,"Vietnam"
- VU,"Vanuatu"
- WF,"Wallis and Futuna"
- WS,"Samoa"
- YE,"Yemen"
- YT,"Mayotte"
- ZA,"South Africa"
- ZM,"Zambia"
- ZW,"Zimbabwe"
Written by Hostwinds Team / April 24, 2018
